Pages

Thursday, August 29, 2013

Updating Dining Room Chairs

Sorry, for not writing a real blog post in two weeks! The month of August has just flown by and my life has been kind of crazy. I am really looking forward to Labor Day weekend  to just relax.  I am also anxious for the month of September because I can start breaking out the fall decorations. I have been working on several projects and have been able to mark them off of my list. The one project that I have been wanting to get done was painting my "free" dining room chairs.  Yep, you read that right FREE! Have you all heard of Freecycle? Well, if you haven't you really should go check it out. It's basically like Craigslist but everything is free. I was able to score four farm style chairs. Can you believe somebody wanted to get rid of these?


I really love the style of the farmhouse chairs, but not excited about the light wood seats. The chairs also didn't exactly go with my table. So, I gave the chairs a few coats of spray paint using my favorite go to color, "Heirloom White" by Rustoleum. It's not too bright and not too beige.


Here is a picture of what the chairs look like that came with the table. The table was actually my grandparents that they bought in the 1930's. The chairs are very pretty but they are creaky and they seemed too small for the table. I also wanted something that would also fit in with the rest of my house. 


I think the farm style chairs add a lot more character to the table and I like that the chairs are a different color than the table. I also found the two blue chairs at the head of the table at Target. They are super comfy and were easy to put together. I was a little worried that they weren't very durable but they have seemed to hold up well. I was able to get mine on sale for $70 for each chair!


I want to repaint my dining room and foyer now and add moulding, but that will have to wait until this winter. I love that the only thing I bought were the two chairs from Target. 

I hope you all have a relaxing weekend and are enjoying these last few weeks of summer!

By Stephanie Lynn


Monday, August 26, 2013

End of August Gift Card Giveaway

Hello sweet readers! I have teamed up with some awesome bloggers to offer a fabulous giveaway for a $250 gift card of your choice from any of the following stores listed below. 


a Rafflecopter giveaway

This Giveaway is for a $250 Gift Card (Winners Choice) to Target, Michaels, Staples or Visa! 

To enter the giveaway just click on the rafflecopter in this post and follow the steps!

Contest runs from August 26th, 2013 -  September 1st, 2013.  
Your chances of winning increase with each entry you make! Good Luck My Friends!

*The bloggers involved in this giveaway have pulled their money together to offer this gift card. Social Media Sites, Target, Michaels, Staples and Visa are not sponsoring this.

Thursday, August 15, 2013

How to Paint a Nautical Table

Hello there! I am finally able to sit down and write a post. The month of August is always crazy for me and I am feeling like I can barely get anything done. So, what do I do when the laundry piles up and dishes need to be done...I go garage saleing (not sure if that is even a word).  I guess you can say garage saleing is my retail therapy! I love buying somebody else's junk  stuff and re-painting it.  At a  garage sale that I went to a few weeks ago I found a 1970's looking Queen Anne round table for $5.00. It was in great shape and I loved the style! I wanted to share with you how made this little table over with some paint and elbow grease.  


I did some searching for creating a Nautical compass and found a great tutorial at Vintage Revivals. You should really go check out Mandy's blog, her creativity is amazing!


I know everybody loves a good before picture! So here is what my little table looked like before she got a make over.  She was in sad shape!


The first step in re-painting furniture is to clean it and sand it down. I also removed the weird fence things that were in the middle of the table. 


I painted the table with my free sample of Clark and Kensington primer + paint from Ace Hardware. The color is called "Peaceful River" and it is a flat paint.  I did two coats of paint to make sure everything was covered. After I finished painting I started drawing the lines for the compass. I found the center point of the table. I measure the table top from the top to the bottom and divided the measurement by two. I then just followed Mandy's directions and scaled it down to my table. The one thing you must do is to make sure each line is the exact same length on all four sides. 


After I had all of the lines drawn I used two different colors to paint the compass. I alternated the gray on the inner star and white on the outer star. I already had some mis-matched paint that I bought at Lowe's.


I then took a glass plate and traced it on the center of the star to create a circle.


I painted the N, S, E & W using my chalk transfer method and painted the circle white.


I think it is so fun to look back and see what this piece of furniture looked like before and what it looks like now. I am always so amazed at what a few coats of paint can do! I usually spray paint everything but I think I might be a little addicted to painting furniture with a paintbrush. 

Now I just need to come up with a name for this little cutie table. Do you think Kim Kardashian would be upset if I name it North West? ;) 


I hope you all have a great week almost weekend!


By Stephanie Lynn


Friday, August 9, 2013

Favorite Summer Things

Hello there! Today I wanted to share with you some of my favorite summer things. I am trying to mix up my blog a bit from the normal DIY and craft projects. I also think my blog is getting a little boring with just project after project. So today I thought I would take the pressure off of getting my projects done and share some of my faves! I always enjoy reading posts about other bloggers favorite things and and sometimes I find a new product that I didn't even know existed! Also, wanted to make this clear that I am not getting paid by any of these brands. I just love them that much! ;)


Mio Berry Pomegranate Liquid Water Enhancer, 1.62 oz

I have been so addicted to MiO this summer! It gives my water a nice little flavor without all of the sugar and calories. It also fits perfectly in my purse!


Neutrogena Ultra Sheer Dry-Touch Sunblock SPF 45 - 3.0 fl oz Twin Pack


Sunscreen is a must! I am a woman in my 30's and want to keep my skin looking young. Neutrogena is a brand that I use for myself as well as my two year old daughter. I also like that it is not greasy and doesn't smell like a fruity drink. 

Chobani Fat Free Strawberry Greek Yogurt 32 oz
For a little afternoon snack I enjoy some Chobani yogurt. It's also healthy for you and it makes a tasty fruit dip!


I cannot live without this bag from Vera Bradley. It is perfect for diapers, toys and snacks. Also, I don't think it looks like a total mom bag even though it really is.


My Otterbox phone case has survived a lot especially with a curious toddler and a dropsy mama! My phone has been perfectly protected with every drop and the case still looks close to new. 


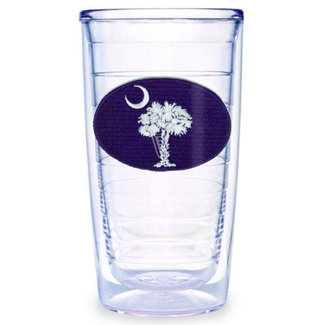
Tervis Tumbler South Carolina Flag 10 oz. Jr-T. Tumbler


I bought this Tervis tumbler last summer while on vacation in South Carolina. I also have a lid that fits on the top. It is perfect for keeping summer drinks cold and travelling in the car.


Seriously the best flip flops in the whole wide world, made by Reef. They are the most comfortable flip flops! I never had to break them in, they were perfect from day one. I don't think I could go without these during the summer.

Do you have any particular summer things that you love?

Hopefully, I will get all of my projects done this weekend and be able to share with all of you! Have a great weekend!

 Also, don't forget tomorrow you can get free paint at Ace Hardware.


Thursday, August 1, 2013

Grandma's Zucchini Bread Recipe

Hello friends! I can't believe it has already been a week since my last post. I really wish summer would just slow down. Summer is one of my favorite seasons and I am very lucky to live in a farming community where there are vegetable and fruit stands everywhere this time of year. I am also lucky to live in such a giving community. A few years ago a group of women from my town started a charity garden market. Area residents and farmers can donate excess produce to the organization and then the public in return can make a minimum donation of $0.25 to a local charity of their choice. So not only are you getting locally grown produce but you are also supporting the community. Pretty cool, huh? It's such a great concept and it is so nice to have fresh produce. Anyway, while I was at the garden market last week I picked up some zucchini. Did you know there are bazillion recipes for zucchini?  My favorite is zucchini bread and my favorite recipe is one that my grandma used.  


I can remember my grandma making this exact same zucchini bread every summer and I couldn't wait for her to send loaves of it home with us. I apologize in advance I am about to get sentimental here. Every time I make this recipe I am reminded of my sweet grandma. She was the kind of grandma that always smelled like cookies or some kind of sweet perfume from Avon (grandma loved Avon), the kind of grandma that instilled in me my love for crafts, she was also the sweetest and cutest grandma ever and I miss her dearly. I am so lucky to have had her and for her to have given me her recipes. :) So, with all of that being said this recipe is very special to me.


Ok, so the first thing you need to do is cut up your zucchini so it is a little more manageable to handle. I also take out the seeds in the middle of the zucchini.


Once you have your zucchini cut up you will then need to grate it. You can either use a food processor or a hand grater. Either one works great! In fact I prefer doing it by hand but my husband cringes when he knows there is a machine that can do it for you. You will need to grate about 2 cups of zucchini to make two loaves of bread. 


Grandma's Zucchini Bread Recipe
Yields: 2 loaves of yummy smelling bread

                 Mix: 
                3 Eggs
                1 C. Oil or Margarine
                2 C. Sugar
                2 C. Grated Zucchini
                3 tbsp. Vanilla

       Add:
               1 tsp. Salt
               1 tsp. Baking Soda
               3 C. flour
               3 tsp. Cinnamon
               1/2 tsp. Baking Powder
Nuts are optional; I used about 1 cup of chopped walnuts 

Mix up all of your ingredients in a large bowl. Pour into 2 greased pans, 9 x 5 x 3. Bake at 350 for 1 hour and 15 min. or until pulled away from the sides. 


Now sit back and enjoy your bread! Your family will love you for making this. I like to warm my bread up in the morning and put a little butter on it. 


The bread also makes a great gift to give to neighbors, friends or co-workers!

I hope you are all having an awesome week and you are able to visit some local farmers markets or produce stands. 

I am linking to: 

I am linking up to:
By Stephanie Lynn