

Showing posts with label Dollar Tree. Show all posts
Showing posts with label Dollar Tree. Show all posts
Tuesday, May 27, 2014
Neverland Birthday Party
Hello to all of you! We have certainly had a busy month around my house. My little girl had a birthday this month. It's crazy how fast time flies when you have a child. Every year since her first birthday I have tried to make all of the birthday decorations and invitations myself. It is so much work but so much fun as well. This year was the first year my daughter has been old enough to know what she wanted to do for her birthday. It all started with the idea of her wanting to have a pirate ship just like captain Hook's on her birthday cake. My daughter is a fan of Jake and the Neverland Pirates and anything Peter Pan. So, I thought it would be kind of fun to do a Neverland themed birthday party for her.


Sunday, March 16, 2014
St. Patrick's Day Mantel
Happy St. Patrick's Day eve friends! I hope you all had a wonderful weekend. I enjoyed a great weekend with my family and friends. Weekends just go by too fast! In honor of St. Patrick's Day tomorrow I thought I would share with you my fireplace mantel.

Tuesday, March 4, 2014
St. Patrick's Day Banner
Wow, has it really been almost a month since my last post? This has been such a long winter my friends and I am so ready for spring. I really wanted to get my spring decorations out but it just felt wrong with the 5 ft. piles of snow sitting on the edge of my driveway. Seriously, winter I am so over you! I am sick of being stuck inside and I am ready to just spray paint something. My spray painting days are still a few months away so in the meantime I must stay inside and keep myself busy. I thought it would be fun to add a few decorations for St. Patrick's Day this year. I made this St. Patrick's Day banner is less than 30 minutes one afternoon for my fireplace mantel.

Tuesday, June 25, 2013
Solar Light Basket
Happy Summer sweet readers! I don't know why but summer has just been so much better this year. I think it has something to do with my silly two year old and her love for discovering new things. We have been spending as much time outside as possible. One of the things that I have really been working on getting completed is our little patio all spruced up. I have about a bazillion things left to do with it, but I wanted to share one of my projects that I did from this past weekend.

Remember my Mason jar solar lights? Well, I had a few solar lights left over from the Dollar Tree that I wanted to use . Of course, I tried to use them in the cheapest way possible. I bet you can't guess where I bought these baskets? I know I am so predictable, but I love my Dollar Tree!


The cut hole looked a little jagged so I hot glued some clothes line that I bought at the Dollar Tree around the square. I then added a little loop to make the basket hang.

I have a basket sitting on my patio and one on a shepherd's hook. I think these would also be great to use when camping or fun to hang from a porch. Not too bad for a few dollars!

Thanks for stopping by!
You can find me on...Facebook, Pinterest & Instagram if you would like to follow more of my projects.
I am linking to:
Little Miss Celebration
Debbie Doos: Pinterest Blitz


 />
/>

Remember my Mason jar solar lights? Well, I had a few solar lights left over from the Dollar Tree that I wanted to use . Of course, I tried to use them in the cheapest way possible. I bet you can't guess where I bought these baskets? I know I am so predictable, but I love my Dollar Tree!

I thought the baskets had the perfect shape to be hung like a pendant or they were just cute sitting!

The first thing I did was spray paint them.I used the colors Fern by Rustoleum for the stripe in the middle and Ivory by Krylon for the rest of the basket. I have found it easier to paint a whole object the color of the stripe and then go back and apply the color that will be the main color. I just used painter's tape to cover up the green to make the stripe.


After my baskets were done drying I was then ready to add the solar light. I just wanted the light and not the stakes so I un-screwed the top of the solar light off the stake and measured the solar panel (the black square) so I knew where I would be cutting the hole.


I used chalk to mark where I would be cutting the hole. The hardest part about making the hole was trying to get it started. I had to cut a few of the weaves in the basket and then I was able to work my way around to make a square.


I then took some gorilla glue and glued the top part of the solar under the hole I just cut.


The cut hole looked a little jagged so I hot glued some clothes line that I bought at the Dollar Tree around the square. I then added a little loop to make the basket hang.

I have a basket sitting on my patio and one on a shepherd's hook. I think these would also be great to use when camping or fun to hang from a porch. Not too bad for a few dollars!

Thanks for stopping by!
You can find me on...Facebook, Pinterest & Instagram if you would like to follow more of my projects.
I am linking to:
Little Miss Celebration
Debbie Doos: Pinterest Blitz
Tuesday, May 7, 2013
Mother's Day Picture Frame
I can't believe Mother's Day is this coming weekend! This month is already flying by! I have been so busy with our outdoor clean up that I almost completely forgot. This year I wanted to give the mothers in my life something that comes from the heart. I had seen these flower pot picture frames around Pinterest a few years ago and decided to make them for my mom and mother-in-law using the grandchildrens' pictures.

I found these itty bitty terracotta pots at the Dollar Tree about a month ago. I had no clue what I was going to do with them. I tend to buy things because they are cute and cheap. I am glad I did buy them because they were perfect for this project!


Once the flower has been cut out you can trace your picture to fit the flower frame. You will need to leave a little extra of the picture so you can glue it to the flower. If it's cut exactly to the size of the flower you won't be able to attach the picture to anything.


Once you have you that all done you can decorate the terracotta plant however you want. I used a little Kraft paper and some ribbon for mine.

I think these would also be cute for a wedding shower, you can use the groom and bride's engagement picture. Or maybe for a party you can use them at table cards. The possibilities are endless. I hope the moms in my life like it!


I found these itty bitty terracotta pots at the Dollar Tree about a month ago. I had no clue what I was going to do with them. I tend to buy things because they are cute and cheap. I am glad I did buy them because they were perfect for this project!

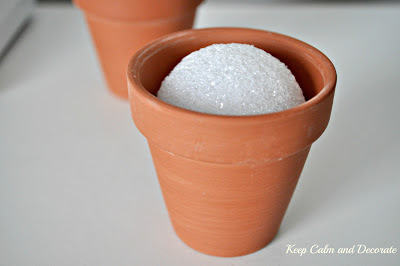
I also had bought these styrofoam 2" balls there for another project that I never got around to. They just happened to fit perfectly in the tiny terracotta pots

I then had these green wooden sticks that somebody was giving away for free at work. I think they might have been used for planters? They were perfect for my project. I just pushed the stick into the styrofoam to create the stem.

I used my Cricut to cut out the flowers for the pictures, you could probably find a flower pattern or use stencils to create a flower if you don't have a die cut machine.


Once you have your picture glue to the flower you can take glue the flower to the stem (stick).

I then used some basket box and bag shred from the Dollar Tree to cover up the styrofoam ball.

Once you have you that all done you can decorate the terracotta plant however you want. I used a little Kraft paper and some ribbon for mine.

I think these would also be cute for a wedding shower, you can use the groom and bride's engagement picture. Or maybe for a party you can use them at table cards. The possibilities are endless. I hope the moms in my life like it!
Do you have any special projects you are working on for the moms in your life?

I am linking to:


Tuesday, April 16, 2013
Mason Jar Solar Lights
Don't you just love all of the things you can do with a Mason jar? My favorite is the old aqua jars with the zinc lids. They look so pretty sitting in a window sill with the sunlight coming through them. Did you know that first Mason jar was invented in 1858? I am also amazed at the popularity of the Mason jar, if you get on Pinterest or most home decorating/craft blogs you are more than likely to see an image of a Mason jar.
.jpg)


Well, I have been wanting to make Mason jar solar lights since I saw them in a catalog three years ago. I can't remember where I saw them first but they were around $40 for the solar light lid and jar. I am a very thrifty girl and $40 was just a little too much money for me to spend on a pretty Mason jar. Last week while I was at the Dollar Tree I spotted some solar lights. I knew for a $1.00 each that this was a sign for me to make my Mason jar light. I have seriously been swooning over for these lights for the past three years. Here is a tutorial for all of those that might have been swooning over them too.
.jpg)
SUPPLIES
Mason Jars
Dollar Tree Solar Lights (Or any solar light)
Duct Tape
Lids for the Jars
Spray Paint (Optional)
Painter's Tape (If you decide to spray paint)


TUTORIAL

First Step: Screw off the top of the light

Prep your lids and the lights for spray paint. I used Duct Brand clean release painter's tape to cover the solar panels on the lights.

Spray paint the lids and lights. I used a few light coats of Krylon's flat black spray paint.


Since, the lights are smaller than what the size of the hole is for the jar I needed a way to keep the light in place. I though duct tape would work well and it's weather proof. I cut the duct tape into 7 inch strips and folded the duct tape in half to make it double sided.

I then wrapped the tape around the light after the spray paint had dried. Note: You don't want to put too much tape around the very top because it will stick out when you put the lid on.

I then placed the light inside of the jar. I wouldn't put too much pressure on getting the lid in. I just kind of pushed it in until it felt snug, adding the lid will make it even more secure.


Can't see the duct tape can you?


Aww, my three year obsession is now over! It's still a little cold here to sit on the patio, but in another month or so I am sure I will be outside enjoying my new lights.
.jpg&description=Easy%20Mason%20Jar%20Solar%20Light%20Tutorial%20%40%20Keep%20Calm%20and%20Decorate)
I am linking to:
Subscribe to:
Posts (Atom)