Tuesday, June 25, 2013

Solar Light Basket

Happy Summer sweet readers! I don't know why but summer has just been so much better this year. I think it has something to do with my silly two year old and her love for discovering new things. We have been spending as much time outside as possible. One of the things that I have really been working on getting completed is our little patio all spruced up.  I have about a bazillion things left to do with it, but I wanted to share one of my projects that I did from this past weekend.


Remember my Mason jar solar lights? Well, I had a few solar lights left over from the Dollar Tree that I wanted to use . Of course, I tried to use them in the cheapest way possible. I bet you can't guess where I bought these baskets? I know I am so predictable, but I love my Dollar Tree!


I thought the baskets had the perfect shape to be hung like a pendant or they were just cute sitting!


The first thing I did was spray paint them.I used the colors Fern by Rustoleum  for the stripe in the middle and Ivory by Krylon for the rest of the basket. I have found it easier to paint a whole object the color of the stripe and then go back and apply the color that will be the main color. I just used painter's tape to cover up the green to make the stripe.


After my baskets were done drying I was then ready to add the solar light. I just wanted the light and not the stakes so I  un-screwed the top of the solar light off  the stake and measured the solar panel  (the black square) so I knew where I would be cutting the hole.  


I used chalk to mark where I would be cutting the hole. The hardest part about making the hole was trying to get it started. I had to cut a few of the weaves in the basket and then I was able to work my way around to make a square.


I then took some gorilla glue and glued the top part of the solar under the hole I just cut.


The cut hole looked a little jagged so I hot glued some clothes line that I bought at the Dollar Tree around the square. I then added a little loop to make the basket hang.


I have a basket sitting on my patio and one on a shepherd's hook. I think these would also be great to use when camping or fun to hang from a porch. Not too bad for a few dollars!


Thanks for stopping by! 

You can find me on...FacebookPinterest &  Instagram if you would like to follow more of my projects.
 
I am linking to:
Little Miss Celebration
Debbie Doos: Pinterest Blitz

DIY Show Off

Project Inspire{d} Button New
TDC Before and After
Home Stories A to Z
/>


Wednesday, June 19, 2013

What I Wore Wednesday

Hello and welcome back to another edition of what I wore Wednesday. I hope you are all having a good week and are having beautiful weather like we are having here. It's been nice to be able to also get some outdoor projects marked off of my list.


Here is what I wore:


Shirt: Old Navy
Skirt: Wal-Mart
Sandals: Kohls


Necklace: Very Jane
(This is an affiliate of mine)

I am linking to:

Tuesday, June 18, 2013

Color Block Plant Stakes

Hello to all of my awesome readers! I hope you are all having a wonderful day. I am sitting here enjoying the beautiful sun shining through my window. It's a little on the cool side outside today but still nice enough to go for a walk or bike ride. It has been such a mild summer for us so far and I am not complaining one bit. I have also been enjoying my little herb garden that I shared with you a few weeks ago. One of the things I did for my herb garden was create plant stakes to identify each herb. I am sure you have seen the trend of color blocking, right? I just adore the look on outfits and bags, but not brave enough to try it on a wall. I thought it would be kind of cool to give some chalkboard paint a little color block.


This is a five minute craft I did while my daughter was sleeping. 


I found these popsicle sticks at the Dollar Tree.


The first thing I did was paint the popsicle stick with the chalkboard paint.  I then used some painters tape to cover up the chalkboard paint after it dried.  Then I spray painted the tips with the same spray paint from this project


Once all the paint was dried I pulled off the tape and there you have it folks a color block plant stake...easy peasy! 


By the way, did you know you can sharpen chalk? I didn't either...I saw it on Pinterest. I just used my regular old plastic pencil sharpener. It has been a life changing moment now that I have sharp chalk. Ok, maybe I am being a little dramatic, but it has made my life easier. 


I wrote on the stakes with my life changing sharpened chalk and popped them in my topsy turvy herb garden. Who says gardening doesn't have to be stylish? 


Don't forget to follow me on my social media networks...FacebookPinterest &  Instagram.
 
I am linking to:

Home Stories A to Z: Tutorials and Tips Party Debbie Doos: Pinterest Blitz

Weekend Bloggy ReadingProject Inspire{d} Button New
DIY Show Off
By Stephanie Lynn


Thursday, June 13, 2013

What I Wore Wednesday

Sorry, this post is a little late getting up this week. Summer is in full swing here and we are loving it. We are enjoying walks on the trails, bike rides and eating lots of fresh fruit!  I also love being able to wear clothes that I haven't worn since the fall. It's like getting a whole new wardrobe.

Here is what I wore this week:


Sweater: Carsons
Striped Top: Old Navy
Jeans: Thrifted


Sandals: Kohls


Watch: DKNY (Mother's Day present)

I am linking to: The Pleated Poppy


Tuesday, June 11, 2013

Outdoor Pallet Sign

I have been wanting to join the trend of making something from a pallet forever! Last fall my husband and I did some landscaping to our front yard and had some pallets left over from the project. My husband  for some reason doesn't understand why I hang onto things that are no longer needed or belong in a dumpster. I am slowly starting to get him to look through my junkin' baby blue eyes. I am working on our little patio and I wanted something that would remind  me of what I needed to do while I was outside and that is RELAX. Sometimes I need things spelled out for me. I knew a sign is what I needed and I knew my junky little pallet would be perfect. So sit back and relax and I will show you how to make this cheap and easy pallet sign. 


The first thing you need to do is dis-assemble your pallet. I am not going to lie to you friends this part was the hardest part. These pallets are made to withstand a lot of weight and are very strong. 


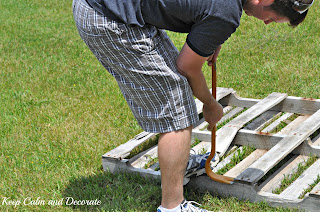
I asked my handsome handyman for his assistance. I did offer him some help and got one stinking board off. It was all I could do to get it off. I was a hot mess by the time I had the one board off. I could see the neighbors watching me and I am sure they were thinking what is this girl doing. Heck, I kept asking myself the same question. Anyway, the best way we could find to get the boards off was to take a crow bar and rubber mallet and just start hammering the crow bar under the nails. It would take a lot of swings, but the board would finally pop off of the pallet. We also had to keep in mind not to pull the board off too fast because it would crack the wood. Just remember slow and steady wins the race!


After all of our hard work we ended up with a pile of beautiful weathered wood! 


PUTTING THE SIGN TOGETHER Step by Step


Step 1: I took (3) pieces of the pallet wood and laid them vertically. I tried to find three pieces that would line up together because some of the pallet pieces were very warped.

Step 2: I used a hacksaw to cut (2) smaller pieces of the pallet for the back of the sign. I cut them down to about 12" in length. 

Step 3: I glued the (2) small pieces and glued them horizontally to the back of the (3) pieces. I used Titebond wood glue to glue the pieces to the back of the sign. 

Step 4: I used finishing nails just to to give it a little extra support

Step 5: This is totally optional but I placed something heavy on the two pieces of wood that were glued on the back just to make sure the glue would dry to the wood.

*Also, I would recommend you let the sign dry for 24 hours before hanging it up.

ADDING THE LETTERS


I found these wooden birch  letters at Hobby Lobby. They were on sale for about a $1.05 and they are 5" in size.


 I spray painted them with Ruste-Oleum Gloss Fern color. Isn't fern the cutest name for a spray paint? I lined the letters up on the board before gluing them on. I have found it easiest to use chalk to mark where the letters go so I don't get them on glued on crooked. 


Thanks for stopping by today! I hope you have a cozy spot in your home where you can sit back and relax. 


DIY Show Off Weekend Bloggy Reading
By Stephanie Lynn
Home Stories A2Z

;
TDC Before and After