This is picture of the shamrock when it came straight out of the bag. It has a beautiful picture of Ireland (I assume). It's not a bad looking shamrock but I think it could use a little help!
The first thing I did was I cut off the green ribbon as well as the tags. Don't get too crazy with cutting of the ribbon because you are going to need that later (remember we are using what we already have). I then picked out some green polka dot paper that I had on hand from forever ago. I traced the shamrock onto the paper and create a template to cut.
I then glued my shamrock paper cut-out onto the Dollar Tree shamrock. It is probably best to use spray adhesive, used a roller tape to adhere the paper to the shamrock.
I then brushed the Modge Podge on top of the shamrock (I used a small foam brush, but any brush would work). I wanted to use Modge Podge to give it more of a sheen look. Did you know Modge Podge comes in different finishes? I prefer the matte finish.
I did have to go back and dab a little hot glue around the edges after the Mod Podge dried. That's why I think spray adhesive might be a little better to use in this project.
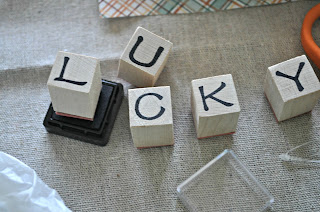
I wanted to create a banner across the shamrock that said "Lucky" for St. Patty's day. I had alphabet, rubber stamps that I had bought from Hobby Lobby a few years back. I am sure you can something like these at any craft store.
I found some burlap color scrapbook paper in my stash and decided to use that for the banner. I first stamped a spot on the paper and created a triangle around it. I used this as my template for the rest of the letters. I would just cut this one out and trace it for the rest of the letters and then stamp. Stamping on a full sheet of paper is easier then stamping on an itty bitty piece. You might have already known that, but just in case.
I arranged my "Lucky" letters to my liking on the shamrock and then hot glued them down and added some buttons (each color of the rainbow) and twine.
I also glued back that little green ribbon to use for a hanger.
And here is the finished project, I thought it turned out pretty cute for $1.07 (gotta include the tax). :)

I am linking to:
Coastal Charm: Nifty Thrifty Tuesday Party
DIY Show Off Party
Home Stories A to Z: Tutorials and Tips Party
House of Hepworths
Fireflies and Jellybeans
We are That Family
Tater Tots and Jello
Skip to my Lou
Or So She Says
A Glimpse Inside
Debbiedoo's
Diana Rambles
Mom 4 Real


Cute!! I love the little bunting on it!! The husband's family is big into the St. Patty's day holiday (they have a very Irish name, although 99% of their ancestors are German, haha). I'm trying to get more into the spirit of the holiday for them :) Thanks for the idea!
ReplyDeleteSuch a cute idea. I love that you were able to give it a makeover using what you had on hand.
ReplyDeleteThanks so much for stopping by my blog. I appreciate your visit.
Nice job Melissa, it looks amazing.
ReplyDeleteHow cute! I am going to have to try this. I always have a Family St. Patrick's Day dinner so I am looking for new decorations. Thanks for sharing.
ReplyDeleteSuper cute! I would love you to come join my Pin Me Linky Party that starts Friday morning at 8am CST. I allow up to 3 links each week! I'm a new follower!
ReplyDeleteThanks for linking up!
DeleteCute! I'm pinning this!
ReplyDeleteNavy Wifey Peters @ Submarine Sunday Link Party
http://www.usscrafty.blogspot.com/2013/03/submarine-sunday-21.html
20150718 chenxin
ReplyDeleteray ban glasses
pandora charms 2015
chaussure louboutin
coach outlet online
hollister clothing store
gucci borse
coach outlet
borse louis vuitton
nike air max
toms shoes
coach outlet online
christian louboutin
coach outlet
burberry sale
mont blanc pen
kate spade handbags
true religion outlet
prada handbags
burberry handbags
ralph lauren uk
pandora jewelry
true religion
chanel bags
pandora charms
coach factory outlet
coach outlet
nike blazer
kate spade handbags
jordan uk
chanel online shop
michael kors outlet
ray ban sunglasses
oakley sunglasses outlet
tory burch outlet online
chanel handbags
cheap jordans for sale
oakley sunglasses sale
cheap jerseys
oakley sunglasses
gucci outlet online
pandora jewelry official site
ReplyDeletelebron 17
lebron 18
yeezy boost
moncler outlet
kobe shoes
kyrie irving shoes
curry shoes
kobe sneakers
yeezy shoes
the original source Ysl replica handbags wikipedia reference Ysl replica check my blog replica louis vuitton bags
ReplyDelete