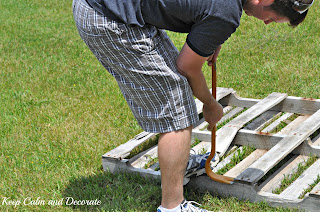
The first thing you need to do is dis-assemble your pallet. I am not going to lie to you friends this part was the hardest part. These pallets are made to withstand a lot of weight and are very strong.
I asked my handsome handyman for his assistance. I did offer him some help and got one stinking board off. It was all I could do to get it off. I was a hot mess by the time I had the one board off. I could see the neighbors watching me and I am sure they were thinking what is this girl doing. Heck, I kept asking myself the same question. Anyway, the best way we could find to get the boards off was to take a crow bar and rubber mallet and just start hammering the crow bar under the nails. It would take a lot of swings, but the board would finally pop off of the pallet. We also had to keep in mind not to pull the board off too fast because it would crack the wood. Just remember slow and steady wins the race!
After all of our hard work we ended up with a pile of beautiful weathered wood!
PUTTING THE SIGN TOGETHER Step by Step
Step 1: I took (3) pieces of the pallet wood and laid them vertically. I tried to find three pieces that would line up together because some of the pallet pieces were very warped.
Step 2: I used a hacksaw to cut (2) smaller pieces of the pallet for the back of the sign. I cut them down to about 12" in length.
Step 3: I glued the (2) small pieces and glued them horizontally to the back of the (3) pieces. I used Titebond wood glue to glue the pieces to the back of the sign.
Step 4: I used finishing nails just to to give it a little extra support
Step 5: This is totally optional but I placed something heavy on the two pieces of wood that were glued on the back just to make sure the glue would dry to the wood.
*Also, I would recommend you let the sign dry for 24 hours before hanging it up.
ADDING THE LETTERS
Thanks for stopping by today! I hope you have a cozy spot in your home where you can sit back and relax.
I am linking to:
Debbie Doos: Pinterest Blitz
Artsy Chicks Rule: Project Inspired Party

Savvy Southern Style
Debbie Doos: Pinterest Blitz
Artsy Chicks Rule: Project Inspired Party

Savvy Southern Style


So cute! I love pallet projects. Nice job.
ReplyDeleteI found your blog from the facebook group Cafe Blogger! I love your blog as well as this project! The finished product looks great!
ReplyDeleteMarie H.
www.progressionbydesign.com
I love this project, that color is wonderful for summer :)
ReplyDeleteThis is really great. I would love it if you would link this up to my link party.
ReplyDeletehttp://www.ifitsnotbaroquedesignblog.blogspot.com/2013/06/tuesday-link-party-23.html
That looks fantastic! What a great way to re-use and re-purpose.
ReplyDeleteIf you have a minute to spare I'd be thrilled if you could share this post at my weekly Say G'day linky party. It's on now and this would make a fabulous addition!
Best wishes,
Natasha in Oz
www.natashainoz.com
Cute cute sign. You will be featured at my party on Monday.
ReplyDeleteBlessings,
Linda
Love your pallet sign! The pretty bright green letters make it so cheerful!
ReplyDeleteI'm visiting today from CRAFT. I hope you get the chance to visit my blog, linkup and leave a comment, too!
~ Megin of VMG206
Link Up Sat thru Friday @ DIY Showcase Link Party
This is CUTE! I can't believe the transformation from an old pallet! I popped over from Home Stories A to Z--thanks so much for sharing!
ReplyDelete~Abby =)
Found you from Tater Tots & Jello....love this!! I think "relax" is one of my favorite words. PInning. :)
ReplyDeleteLove it! And love the green :)
ReplyDeleteSo glad you shared on Project Inspired, Melissa!
Pinned!
Nancy
Oh I love this, very cool!
ReplyDeleteI love your RELAX sign. The green letters really make it pop.
ReplyDeleteThis is so clever! I love it...Looks like a lot of hard work to create a "relax" sign, LOL!
ReplyDeleteLove that your relax sign is so rustic and simple. I thought maybe you'd stain or paint the boards you put the letters on but glad you didn't. I need to make this sign. I go out to sit at table and before you know I'm down at shed looking at what boards we have to make something. Love the big green letters. I need to find those big ones so they'll show up. Great job on your sign, glad you shared the details. Happy Summer Now I need to go save the tutorial. Can't print out til next Wed. SS payday, finally after 5 weeks.
ReplyDeleteI love your blog! Thanks for joining our Pinterest party. Your post is beautiful with perfect pins. See you next week I hope! ~Ann
ReplyDeleteI love the rustic look of your sign with the "fern" green letters. Nicely done! Wish I had some pallet wood already "seasoned" to make one of these. I like the authentic aged look of the wood (like yours) & not the Pinterest version.
ReplyDeleteI love a good pallet project! Pinning this :)
ReplyDeleteKim @ *Soliloquy Of Food & Such*
Very cute! I hear you on the effort of taking pallets apart - I struggled with one months ago, and now my dad's brought me three more to play with. UGH.
ReplyDeleteThis comment has been removed by the author.
ReplyDeleteWonderful job - it was worth all the sweat and hard work by you and the handyman ;-)
ReplyDeleteWe are linking up awesome pallet projects at Empty Your Archive and I would totally love for you to share this - Alice @ Mums Make Lists
http://mumsmakelists.blogspot.co.uk/2013/10/empty-your-archive-28.html
pallet projects are so abundant
ReplyDeleteholy cow I need some pallets!!
ReplyDelete20150718 chenxin
ReplyDeleteray ban glasses
pandora charms 2015
chaussure louboutin
coach outlet online
hollister clothing store
gucci borse
coach outlet
borse louis vuitton
nike air max
toms shoes
coach outlet online
christian louboutin
coach outlet
burberry sale
mont blanc pen
kate spade handbags
true religion outlet
prada handbags
burberry handbags
ralph lauren uk
pandora jewelry
true religion
chanel bags
pandora charms
coach factory outlet
coach outlet
nike blazer
kate spade handbags
jordan uk
chanel online shop
michael kors outlet
ray ban sunglasses
oakley sunglasses outlet
tory burch outlet online
chanel handbags
cheap jordans for sale
oakley sunglasses sale
cheap jerseys
oakley sunglasses
gucci outlet online
ReplyDeleteKeep calm Signs-Find the Best Keep Calm Wallpaper & video at Keep calm signs. We are updating daily basic on our website best keep calm and love and keep calm posters. Enjoy our best Keep Calm Quotes
Our Buccaneers House Flag hangs vertically and provides a top sleeve for insertion of your flagpole. The Buccaneers House Flag measures 28x42 inches, is constructed of 2-ply polyester, and both sides are dye sublimated with the NFL team logo as shown.The house flag for Buccaneers has a liner sewn between its two polyester sides, therefore, this flag is viewable and readable correctly on both sides.Hang your Buccaneers House Flag with our banner pole or fly it with our 5' wood flagpole and adjustable flag bracket.stars and stripes flags,
ReplyDeletefootball flags saleHouston Oilers stars and stripes flags
Miami Dolphins banners
My husband was diagnosed with early onset Parkinson's disease at 57.his symptoms were shuffling of feet,slurred speech, low volume speech, degradation of hand writing, horrible driving skills, right arm held at 45 degree angle, things were tough for me, but now he finally free from the disease with the help of total cure from ULTIMATE LIFE CLINIC, he now walks properly and all symptoms has reversed, he had trouble with balance especially at night, getting into the shower and exiting it is difficult,getting into bed is also another thing he finds impossible.we had to find a better solution for his condition which has really helped him a lot,the biggest helped we had was ultimate life clinic they walked us through the proper steps,am highly recommended this www.ultimatelifeclinic.com to anyone who needs help.
ReplyDeletelong narrow art
ReplyDeletegreen and gold painting
long narrow vertical wall decor
3 piece painting
modern elephant wall art
bape hoodie
ReplyDeleteTravis Scott Jordan
hermes outlet online
kyrie 7 shoes
fear of god
golden goose superstar sale
nba star shoes
curry 9
jordan 13
kyrie shoes